(Otherwise known as starting Sourdough starter)
Sourdough has a reputation for being terribly erratic. To quote James Beard in Beard on Bread:
“I have found, for example, that the starter can react differently within the same region. In New York City I never had the success with it that I had in Connecticut or Long Island or Massachusetts. I have even found variations in it’s performance in from one neighborhood in New York to another.”
I’m not surprised. Some yeasts are extremely specific to geographical location. Other yeasts are specific to human ethnicity. In a place as diverse as New York City one city block can make a big difference in the type of yeast that grows naturally. When making sourdough bread, the yeasts that naturally occur in your own home will always work the best. I think most of the professionals have forgotten that yeast, and the art of fermentation are a gift from God. One doesn’t have to analyze how yeast interacts with grains; one can simply enjoy the bread and give thanks to God. It’s not rocket science. It’s easy. It happens naturally. It is working with nature, not an exact science!
Bread was probably the very first “manufactured” food humans created, closely followed by the other foods created by fermentation: beer, ale, wine, yogurt and cheese. These foods have been around for at least 8,000 years! Foods made via fermentation are found in every culture in the world. Bread is eaten everywhere. It is one of the most visible symbols of our common humanity. Where there is bread there are people, there is warmth, and there is food.
No matter where you live, or how clean you keep your home, there is wild yeast all around you: on your skin, in the air, on all the plants and animals. You don’t see it because there aren’t very many in one small space. Your goal is to attract the wild yeast and convince them to form a colony in your small bowl of flour paste. Where wild yeasts gather, so do certain bacteria. Together the yeasts and bacteria “eat” the flour, producing alcohol and carbon dioxide. That’s why we “feed” a sourdough starter. The yeasts need the wet flour to remain alive.
The wild yeasts that start your sourdough starter have one natural enemy that is almost as plentiful as the yeasts — mold. If mold gets into your sourdough starter there is nothing to do except throw it out! The molds that like flour are usually black, orange, blue, or very dark brown in color and they usually form a small circle that floats on top of the sourdough. Eventually molds develop a “fur” that’s very visible — but don’t let the mold stick around that long! If, at any time, mold starts growing on your sourdough take the dish and all of the sourdough outside and throw it away. (You can keep the dish if — and only if — you clean it well. Scrub the dish with salt and vinegar before you wash it with soap and water.)
The other reason a sourdough starter may fail isn’t natural at all — it’s totally man-made. There are several cleaning products such as Lysol spray, oven cleaner, and chlorine bleach that can kill a whole colony of wild yeasts. Fortunately (from the point of view of one who makes bread) it’s impossible to keep a kitchen completely sterile. If you want to use such products make sure your colony of wild yeasts is safely residing in your refrigerator before you clean! I speak from experience. I killed off many wonderful sourdough starters before I realized that the fumes alone are sometimes enough to destroy a colony. If I can smell a cleaning product, it’s likely to kill off my wild yeasts.
Are you ready to start your very own sourdough starter?
When you start your sourdough starter you will need:
A small bowl (the size of a cereal bowl)
A one quart (or larger) crock or glass jar that fits easily in your refrigerator (A clean mayonnaise jar is cheap and works well.)
A spoon
All purpose flour (what Europeans call “soft flour” – whole wheat or white — it doesn’t matter as long as it’s made from wheat)
Water that does not have chlorine in it — rainwater, well water, or some brands of bottled water. (To use drinkable city water fill a wide shallow pan with water and leave it, uncovered, on the counter for 24 hours before using.)
Day One:
In your small bowl stir together:
1/2 cup flour
2/3 cup water
This will make a thin, liquid paste. Make sure there are no lumps of flour. Put the bowl somewhere where it won’t be disturbed for 24 hours. Do not cover the bowl!
Day 2 and beyond… (Every day you have a weak starter, you start here…)
Before you disturb your bowl of paste, look at it carefully.
Has the flour sunk to the bottom of the bowl or is it still suspended in the water?
If the flour has sunk to the bottom, stir in 2 tablespoons of flour to make a thicker paste. Make sure there are no lumps, and put the bowl in a slightly warmer place for 24 hours. You didn’t do anything wrong – different flours absorb water differently. Do not cover the bowl.
Is the paste covered with a soft crust? (The crust may even be cracked. If you’re lucky there’s also a slight odor and some slightly colored liquid glistens on the top.)
Oops… it’s too hot or you’ve left it alone for too long. Did you leave it on a window sill, or in direct sunlight? Yeast prefers dark places… As long as it’s not a dry solid mass there is need to worry! Stir the mess down – it may be quite stringy. If the crust sticks to the spoon, just rinse the spoon off. (If it doesn’t stick to the spoon the crust can be ignored – there’s enough moisture in it for the crust to be absorbed.) Add 1/4 cup water and stir the mess into a smooth paste without lumps. Then add 2 tablespoons of flour and stir again. When you have a doughy paste let it rest, uncovered in a dark place for 24 hours.
Are there tiny bubbles or tiny “islands” of wet flour floating on top of some liquid?

Congratulations! You’ve got wild yeast! It is time to prove there’s enough active yeast in the mix!
Proving the yeast is active
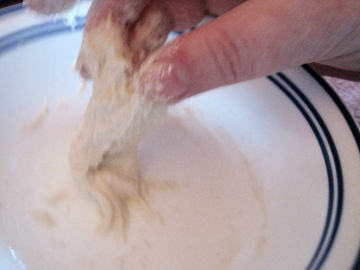
Put 1 heaping tablespoon of starter into a different bowl. Add 1 scant tablespoon of flour. Combine the starter and flour to form a miniscule amount of dough that can be worked with the fingertips of one hand like this:
Once the dough is stretchy (or when you get tired of playing with it…) make a small ball:

and let it sit for one hour.
One hour later, fill a 4 cup measuring cup with water, wet your hands so the dough doesn’t stick to your fingers, scoop up the dough ball, and drop it in the water!
If the ball of dough sinks like this:  You may have added too much flour to the dough (you can always retest tomorrow using less flour) or there aren’t enough active yeast in your colony to raise your bread yet. Feed your colony 2 tablespoons of flour and 2 tablespoons of chlorine free water. Stir until smooth, and put the bowl back in it’s safe place for 24 hours. Do not cover the bowl.
But if the dough floats: Complete success! Your new colony of wild yeasts is happily living in your kitchen! It may have taken you a week or 10 days to get here, but you’ve done it! As long as you feed it regularly, your new colony can live forever in your refrigerator.
You won’t have enough yeast to cook with yet, so get out your crock or glass jar. Add 1/2 cup of flour and 1/2 cup of water to the main colony, stir until smooth, and pour it into it’s new home! (As long as your water tastes good, it won’t matter if it has a little chlorine in it. It will kill some of the yeast but probably not all of it.) You can keep the crock or jar on your counter or you can put a lid on it and store it in the refridgerator (cold will slow down the yeast growth.) 24 hours later, feed it another 1/2 cup of flour and 1/2 cup of water. One hour after that, you can scoop out enough starter to make most breads and still have enough starter to keep the colony going!
Remember to feed the colony at least once a week if you keep it in the refrigerator. Feed it once every three days if you keep it on the counter. And, of course, feed it every time you make bread!

I used to make all our own bread, pizza, bagels, you name it. Then I stopped eating gluten (which literally reversed my lifetime of allergy and sinus problems while also slowing my early arthritis problems). I still make bread and pizza for my family, but don’t even bother eating the awful gluten-free versions. I’ve been reading about earlier strains of wheat that are less reactive in sensitive people but knew very little about wild yeasts. I’m excited to read this and will launch a new colony soon! Many thanks.
LikeLike
Unless you’ve actually been diagnosed with celiac disease via a blood test, you may be in for a pleasant surprise by using wild yeast! A wild yeast colony is a true “colony” of wild yeasts, bacteria, and the alcohol they produce, while *all* store bought yeasts are a monoculture that has been traced via gnomes to a single type of “barm” from Paris in the time of Louis the Sun King. And when Paris bakers were forced to use it, Paris got terribly sick. I think many of the people who are helped by going gluten free, actually need to be “monoculture yeast free.” The earliest type of “wheat” that’s still grown is called “spelt” , but make sure it hasn’t been contaminated in processing. The USA permits several known poisons (banned in almost ALL other countries) to be used in processing *without* putting it on the label. I’ve already written a blog post about that… I think it’s “A rather different multigrain bread.”
https://en.wikipedia.org/wiki/Spelt
LikeLike
https://wordpress.com/post/olddough.wordpress.com/1283 i
LikeLike